Erasing files, formatting a drive, even deleting a partition does not wipe the actual data from your hard drive. If you want to sell your computer (or completely clean it after malware) you need to make sure the data is actually destroyed and completely nuke the drive. Here’s how.
When you erase a file on your computer, all Windows does is overwrite the first character of the file name with a special character, and marks the file in the partition table as blank space. This can be undone. Same with formatting a drive – it just creates a nice blank partition table. The partition table is a list of all the files on a drive and where they are physically located on the drive. Obviously wiping this makes Windows unable to find the files, but all their data is still there, and can be easily recovered. I have recovered data many times from formatted hard drives and deleted files. You can use very cheap or free tools to recover the data – it’s pretty easy.
The only way to really destroy the data is to over-write every single bit on the hard drive with random 1s and 0s. No, that is not the same as a low level format, low level formats don’t over-write the data, and it can still be recovered. You need a special program to over-write the whole hard drive.
The simplest and best tool I have used to completely wipe a hard drive is DBAN. Darick’s Boot And Nuke. It was discontinued in 2015, but it still works great. And did I mention it’s free?
Here’s how to get it and use it:
Getting your Boot CD or Boot USB ready
Download the iso image from source forge. Yes – the iso file. If you want to make a bootable USB drive, you still need the ISO file.
https://sourceforge.net/projects/dban/files/dban/dban-2.3.0/dban-2.3.0_i586.iso/download
If you are creating a boot cd, just use your cd burning software to burn the iso to a cd, and skip to the next section.
If you are booting to a USB drive, you need to convert the ISO to a bootable USB drive. For this I recommend the free tool Rufus.
Download the portable version – it doesn’t need to be installed, and can be just run from your download folder.
Insert a blank (or happy to be wiped) USB Drive of 1Gb or more. This drive will be wiped.
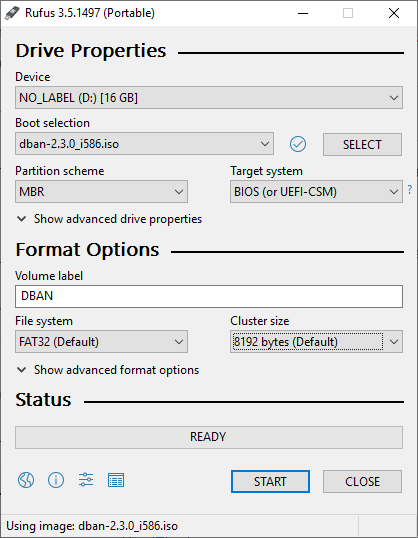
OK, after running this, you now have a bootable USB drive. Note: Cluster size depends on the size of the USB drive. Just go with what it recommends.
However, if you try to boot from this drive, it may not work. The issue is now the target PC, not the boot USB drive.
Getting the Target PC to boot from USB or CDROM
Turn on the target PC and get into the BIOS. This is done by pressing a key (try F1, F2, F10, Delete or Esc)
When you are in the Bios, go to the Startup settings. In here, make sure you select LEGACY for the USB type instead of UEFI. This is essential. Then make sure the boot order has the USB drive and CD Drive above the built in hard drive.
Using DBAN
OK, reboot the Target PC, and after loading you should get the DBAN menu.
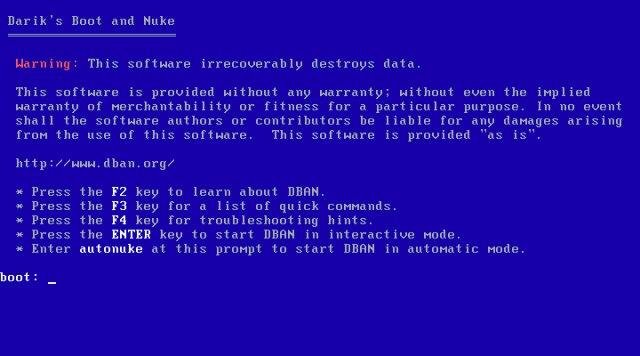
If you don’t mind wiping your USB drive as well, just type:
autonuke
And it will wipe every hard drive it can find, including the USB drive.
If you don’t want to wipe the USB drive, press Enter to go into the DBAN menu (it takes a good 3-5 mins to load). Once this has loaded, select the drive (space), choose the algorithm (M), and F10 to start.
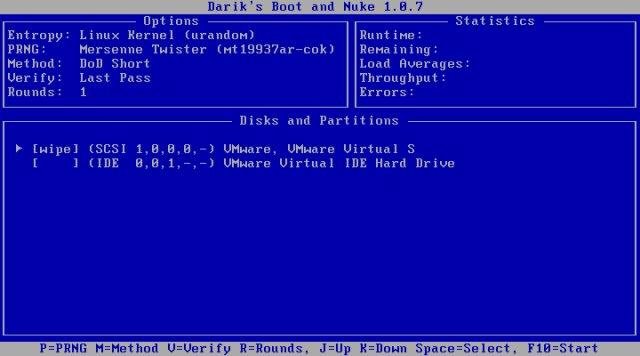
I like the DOD 7 pass wipe myself. The default is a single pass, so if you are feeling extra paranoid, go into the method menu and select DOD 7 passes or more.
Please note that the wiping process should take a while – several hours. If it ends very quickly, it didn’t find your hard drive.
Once this is completed successfully, it is very, very unlikely any data will ever be recovered from your hard drive.
Oh, and if you had Windows 10 on it, you can just re-install Windows 10 without a serial number – it will recognise the hardware and use the old license.
Enjoy!
https://shorturl.fm/qwhsD
https://shorturl.fm/7HyoG
https://shorturl.fm/Ymt0u
https://shorturl.fm/TXP1Y
https://shorturl.fm/6RRv0
https://shorturl.fm/MyY1v
https://shorturl.fm/lVeY8
hi,
I have checked so many website, your website is very amazing. you should try this website